

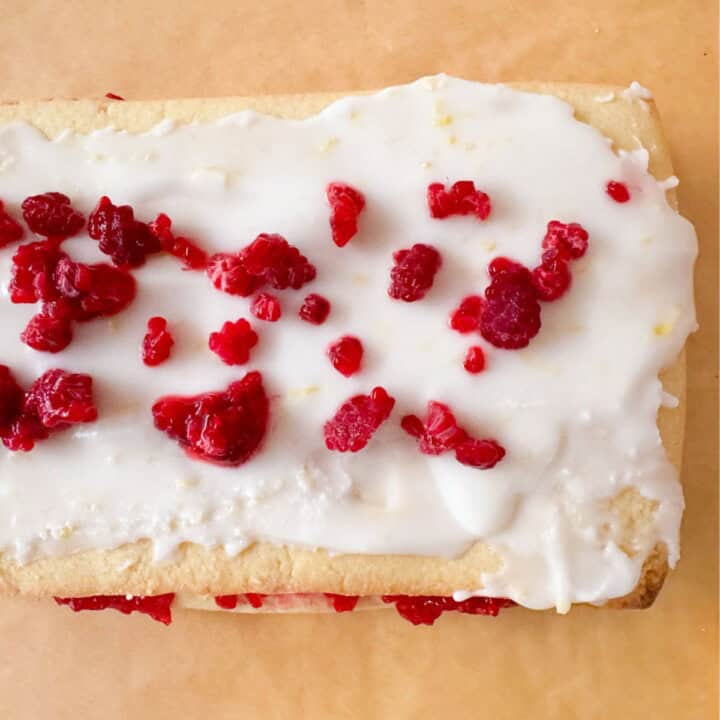
"You can't have a Juneteenth celebration without a red velvet treat of some kind on the table! This tasty twist on red velvet cake turns it into a cool, creamy ice cream sandwich with chewy red velvet cookies."
- Alliah L. Agostini
What's better than easy no-churn ice cream and tasty red velvet cake cookies? We'd say putting them together for a unique and colorful ice cream sandwich. Let us show you how easy it is to make them while we explore the history of Juneteenth.
Learn more about cooking with kids.
If you like these red velvet ice cream sandwiches, you'll love the cinnamon roll pound cake.
Jump to:
- The Juneteenth Cookbook
- Cinnamon Roll Pound Cake
- Hindbærsnitter
- Food from Around the World: Free Cooking Lessons
- How to Make Red Velvet Ice Cream Sandwiches
- Top Tip
- Food Allergy or Substitution Needed?
- Red Velvet Ice Cream Sandwiches
- Free Red Velvet Ice Cream Sandwiches Recipe for Pre-Readers and Up
- Red Velvet Ice Cream Sandwiches
Disclosure of Material Connection: Some of the links in the post are "affiliate links." This means if you click on the link and purchase the item, I will receive an affiliate commission. Amazon links are not affiliate links. You can read my full affiliate disclosure.

The Juneteenth Cookbook
These red velvet ice cream sandwiches are from The Juneteenth Cookbook: Recipes and Activities for Kids and Families to Celebrate by Alliah L. Agostini with Chef Taffy Elrod.

Inside, Alliah shares the history of Juneteenth:
On June 19, 1865, months after the Civil War ended, Union general Gordon Granger and thousands of troops first arrived in Texas. They shared and enforced the news that enslaved African people in Texas had been emancipated, which means that they had been freed from being forced to work for no pay. This happened nearly two and a half years after slavery had been made illegal in Texas.
Slavery was a cruel system justified by racist beliefs, using African people as a cheap labor source to build what would later become the United States and its economy. Though 1619 is noted as the start of slavery in what were then British colonies, slavery had existed there since 1529. Over 400,000 Africans, primarily West Africans, were kidnapped and survived the trip to America (millions more were taken elsewhere), though about 10 million people would be born into American slavery.
In 1861, the issue of slavery officially divided America, launching the Civil War. America split into the Union, where slavery was mostly banned, and the Confederacy, where it was supported.
During the War, President Abraham Lincoln issued the Emancipation Proclamation, an order he wrote to free enslaved people in the Confederacy. The Emancipation Proclamation took effect on January 1, 1863. But it was difficult to enforce this order, especially in Texas, which was far from Union troops.
On January 31, 1865 the Thirteenth Amendment was passed to outlaw slavery in all states. In faraway Texas, this amendment wasn't enforced for another five months, until General Gordon Granger and his troops reached Galveston on June 19.
That day became known as Jubilee Day, and over time became better known as Juneteenth (June + nineteenth). Over its 160-plus year history, this Texan emancipation - or freedom - celebration rippled beyond Texas as the story of Juneteenth spread, and other Black communities learned about and adopted it as an Independence Day of their own.
- Alliah L. Agostini

The Juneteenth Cookbook includes recipes, music playlists, activities, and field trips, including the African American Museum of Dallas, the Home of Opal Lee, the Juneteenth Freedom Walk in Galveston, and Emancipation Park in Houston.

related recipe!
Cinnamon Roll Pound Cake
Learn about the shoebox lunch with this delicious pound cake recipe from Jocelyn Delk Adams.
If you enjoy making creative holiday desserts, try the sugar skulls, mooncakes, thumbprint cookies, and putizza.
related recipe!
Hindbærsnitter
These Danish cookies taste like world-class Pop-Tarts.
Looking for more diverse cooking resources?
Family & Kid's Cooking Resources
Beautiful and diverse cooking resources for you!

Food from Around the World: Free Cooking Lessons
Learn from some of the most talented chefs around the world!
Free Cooking Course for Families
Discover recipes for every continent! Sign up to receive free cooking lessons for the whole family. Learn from some of the most talented chefs around the world and participate in the quality practical life experiences Montessori education is known for.
Find out more about the cooking course.


How to Make Red Velvet Ice Cream Sandwiches
Top Tip
If you're looking to avoid artificial dyes, use Watkins food coloring to make the red velvet cookies. You can also skip food coloring altogether and they're just as delicious.
No-Churn Ice Cream
- heavy cream - the heavy cream should be cold for this no-churn ice cream
- cream cheese - softened cream cheese works best
- condensed milk
- vanilla extract

Red Velvet Cake Cookies
- butter - you want softened unsalted butter for this recipe
- brown sugar - light brown sugar is recommended for the best red velvet cookies
- egg - 1 large egg is all you need
- flour - any all-purpose flour will work. We like this silky red may wheat pastry flour for the softest red velvet cookies
- cocoa powder - Dutch-process cocoa powder is recommended but you can use what you have on hand. We like Anamalai Cocoa
- baking soda
- salt - fine table salt is recommended
- buttermilk
- food coloring - grab the red food coloring for these red velvet cookies
- vanilla extract
- vinegar - you need white vinegar for this recipe
Food Allergy or Substitution Needed?
Click the button below to ask AI how to alter it for your diet!
Equipment
- apron
- prep bowls
- kitchen scale
- measuring spoons
- measuring cup
- stand mixer or hand mixer
- spatula
- baking slab or cookie sheets lined with parchment paper
- baking dish or metal loaf pan lined with plastic wrap
- learning tower (as needed)

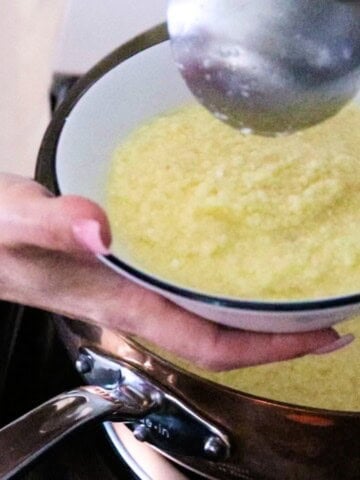
Beat the Cream
Wash your hands with soap and water. Measure the cream using a measuring cup. Pour the cream into a mixing bowl. Use a stand mixer or hand mixer to beat the cream. It should look pillowy and fluffy with soft peaks when finished. Set aside for later.

Whip the Cream Cheese
Place the cream cheese in a mixing bowl and whip until it is light and creamy.

Add the Condensed Milk & Vanilla
Add the condensed milk to the cream cheese. Use a measuring spoon to add the vanilla extract to the bowl. Beat until it is well blended.

Fold the Whipped Cream into the Cream Cheese Mixture
Add a spoonful of the whipped cream to the cream cheese mixture. Gently mix to make the mixture fluffier. Afterward, add the remaining whipped cream. Use a spatula to fold the whipped cream into the mixture gently.

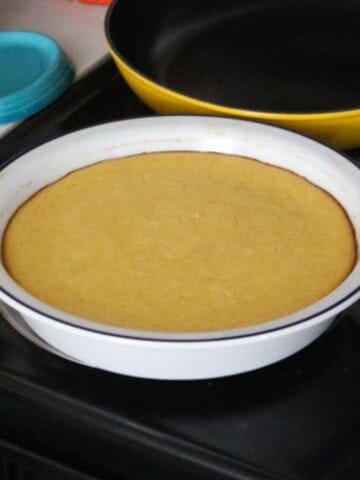
Transfer to the Baking Dish & Freeze for No-Churn Ice Cream
Transfer the contents of the bowl to a baking dish lined with plastic wrap or parchment paper. Place the dish in the freezer for at least 3 hours.

Combine the Butter, Brown Sugar, & Egg
While the ice cream is in the freezer, make the red velvet cookies.
Use a kitchen scale to weigh the brown sugar and flour. Set the flour aside. Add the brown sugar and butter to a large mixing bowl. Use the mixer to combine. Whip until the mixture is light and fluffy. Crack an egg into the bowl and continue mixing.

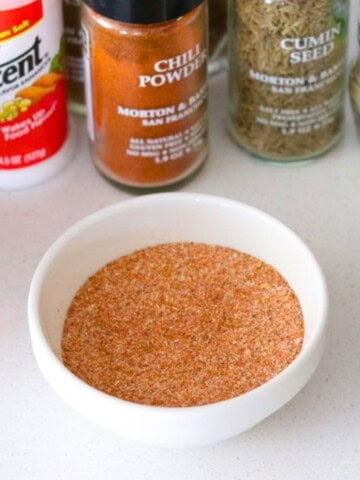
Combine the Flour, Cocoa Powder, Baking Soda, & Salt
Use a measuring spoon to add the cocoa powder, baking soda, and salt to the bowl with the flour.

Mix the Buttermilk, Food Coloring, Vanilla, & Vinegar
Add the buttermilk, food coloring, vanilla, and vinegar to a measuring cup. Use a spoon to stir the ingredients together.

Combine ½ the Flour Mix with the Butter/Sugar Mixture
Add half the flour mix to the bowl with the butter and sugar mixture. Mix until they are well combined.

Add the Buttermilk Mixture
Add the buttermilk mixture to the flour/butter/sugar mixture. Use the lowest speed on the mixture to prevent splashing.

Add the Remaining Flour Mixture
Add the remaining flour mixture to the bowl and mix until the ingredients are well combined. Use a spatula to scrape the bottom of the bowl.
Preheat the oven to 350 degrees Fahrenheit.

Roll the Dough into Balls
Use a spoon or ice cream scoop to make balls of cookie dough about 2 tablespoon each. Place the dough balls onto the cookie sheet or baking slab.
Bake the Red Velvet Cookies for 8 Minutes, Freeze for 30 Minutes
Bake the cookies for about 8 minutes. They will spread out, be puffed in the middle, and have set around the edges. Turn off the oven. Let the cookies cool on the cookie sheet. Transfer them to the freezer for 30 minutes.

Assemble the Red Velvet Ice Cream Sandwiches
To assemble the red velvet ice cream sandwiches, place a scoop of ice cream onto the bottom of one cookie and then place the bottom of another cookie on top. Press the cookies together and you're ready to eat.
You can also wrap them in foil or plastic and store them in the freezer for up to a month.


free recipe!
Red Velvet Ice Cream Sandwiches
Homemade cream cheese ice cream between delicious red velvet cookies
Free Red Velvet Ice Cream Sandwiches Recipe for Pre-Readers and Up
Grab your free printable recipe cards above. Kids can gather ingredients using the ingredient list, gather their equipment with the tools list, and prepare the meal using the step-by-step recipe cards, with assistance as needed.
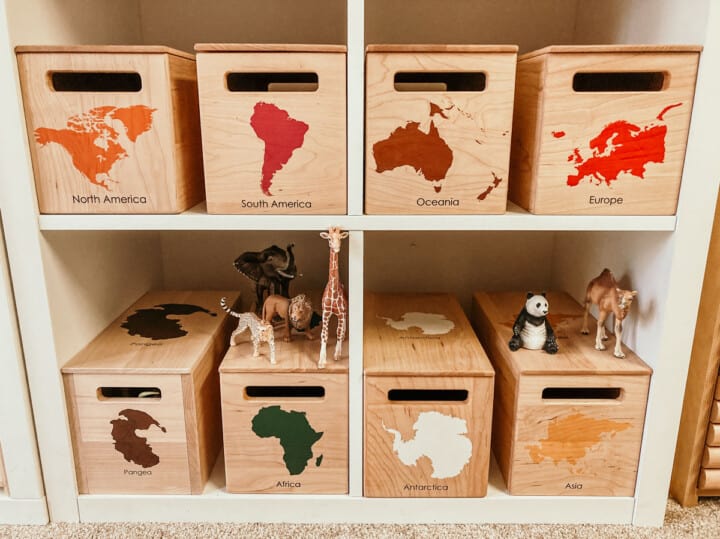
The cards are easy to use, include pictures, and encourage confidence and independence in the kitchen. They also make an excellent addition to your Montessori continent box for North America.
Montessori Continent Boxes
Explore every continent with these solid maple hardwood boxes.

Red Velvet Ice Cream Sandwiches
Equipment
- Stand Mixer or hand mixer
- Silicone Spatula
- Baking Slab or cookie sheets with parchment paper
- 8 x 8 Baking Dish or metal loaf pan lined with plastic wrap
Ingredients
No-Churn Ice Cream
- 2 cups heavy cream cold
- 8 oz cream cheese full-fat
- 1 can sweetened condensed milk
- 1 teaspoon vanilla extract
Red Velvet Cookies
- ½ cup unsalted butter softened
- 1 cup light brown sugar
- 1 egg large
- 1 ½ cups red may wheat flour
- 2 tablespoon cocoa powder
- ½ teaspoon baking soda
- ½ teaspoon salt
- 2 tablespoon buttermilk
- 1 tablespoon red food coloring
- 1 teaspoon vanilla extract
- 1 teaspoon white vinegar
Instructions
- Beat the Cream: Wash your hands with soap and water. Measure the cream using a measuring cup. Pour the cream into a mixing bowl. Use a stand mixer or hand mixer to beat the cream. It should look pillowy and fluffy with soft peaks when finished. Set aside for later.
- Whip the Cream Cheese: Place the cream cheese in a mixing bowl and whip until it is light and creamy.
- Add the Condensed Milk & Vanilla: Add the condensed milk to the cream cheese. Use a measuring spoon to add the vanilla extract to the bowl. Beat until it is well blended.
- Fold the Whipped Cream into the Cream Cheese Mixture: Add a spoonful of the whipped cream to the cream cheese mixture. Gently mix to make the mixture fluffier. Afterward, add the remaining whipped cream. Use a spatula to fold the whipped cream into the mixture gently.
- Transfer to the Baking Dish & Freeze for No-Churn Ice Cream: Transfer the contents of the bowl to a baking dish lined with plastic wrap or parchment paper. Place the dish in the freezer for at least 3 hours.
- Combine the Butter, Brown Sugar, & Egg: Use a kitchen scale to weigh the brown sugar and flour. Set the flour aside. Add the brown sugar and butter to a large mixing bowl. Use the mixer to combine. Whip until the mixture is light and fluffy. Crack an egg into the bowl and continue mixing.
- Combine the Flour, Cocoa Powder, Baking Soda, & Salt: Use a measuring spoon to add the cocoa powder, baking soda, and salt to the bowl with the flour.
- Mix the Buttermilk, Food Coloring, Vanilla, & Vinegar: Add the buttermilk, food coloring, vanilla, and vinegar to a measuring cup. Use a spoon to stir the ingredients together.
- Combine ½ the Flour Mix with the Butter/Sugar Mixture: Add half the flour mix to the bowl with the butter and sugar mixture. Mix until they are well combined.
- Add the Buttermilk Mixture: Add the buttermilk mixture to the flour/butter/sugar mixture. Use the lowest speed on the mixture to prevent splashing.
- Add the Remaining Flour Mixture: Add the remaining flour mixture to the bowl and mix until the ingredients are well combined. Use a spatula to scrape the bottom of the bowl. Preheat the oven to 350 degrees Fahrenheit.
- Roll the Dough into Balls: Use a spoon or ice cream scoop to make balls of cookie dough about 2 tablespoon each. Place the dough balls onto the cookie sheet or baking slab.
- Bake the Red Velvet Cookies for 8 Minutes, Freeze for 30 Minutes: Bake the cookies for about 8 minutes. They will spread out, be puffed in the middle, and have set around the edges. Turn off the oven. Let the cookies cool on the cookie sheet. Transfer them to the freezer for 30 minutes.
- Assemble the Red Velvet Ice Cream Sandwiches: To assemble the red velvet ice cream sandwiches, place a scoop of ice cream onto the bottom of one cookie and then place the bottom of another cookie on top. Press the cookies together and you're ready to eat. You can also wrap them in foil or plastic and store them in the freezer for up to a month.
Notes
- Never leave cooking food unattended
- See more guidelines at USDA.gov.
- Full Lesson Info and Pictures at: https://happyhomeschooladventures.com/ice-cream-sandwiches
Nutrition
Estimated nutrition information is provided as a courtesy and is not guaranteed.
Leave a Reply